Welcome!

It is my hope that I can help to inspire your creativity and encourage your to try something new. I am always searching for new ways to express my creativity and imagination. Cards, invitations and 3D objects tend to be my focus, however I dabble in other media including acrylics, watercolours, sewing, custom picture framing and jewelry making to name a few.

If you have an idea of request for a .cut file in an unconventional way I would love to hear all about it! Constructive feedback is always appreciated.

On occasion I will offer Cricut Design Studio .cut files for free download. Please note that all files are my personal property and may not be used for retail or resale purposes. My files are being shared only for your personal use. You may not acquire my files for financial gain.

Sunday, December 20, 2009

Merry Christmas & Happy New Year

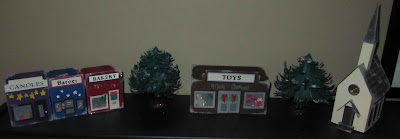
3D Christmas Village & Trees
created entirely from cardstock and my Cricut Expression.
I have to admit that 2009 has been a year of great change in my life. I have been working really hard this year live healthier and I had bariatric surgery in October. I have lost 60 pounds as of this week, 41 of which has been since surgery. It is a big change, but an exciting one and I cannot wait to see what 2010 brings. There were a lot of other changes in 2009 too. My family and I worked very hard at getting the landscaping completed in my backyard. Staining the fence, planting perrenials, laying bricks, and painting the house made a huge change to my yard. The house is barely recognizable and I am so grateful for all of my family and friends who made it all possible.


I have to say that owning a Cricut Expression has made a real change in my life too. I was able to create wedding invitations and save the dates that turned out amazing and wouldn't have been possible without a Cricut. Being part of the Custom Crops Design Team has also been a wonderful experience. Though I may not have been as prolific as I would have liked, being a part of the team and knowing that many other people enjoy using my .cut files gives me a great sense of pride. I am looking forward to pushing the limits of my Cricut to see what I can create in 2010. I just finished creating a Christmas Village, complete with a church, trees and stores...all in 3D. The Village .cut files are available at http://www.customcrops.com/. The picture of the village is at the top of this post.

My back may still be the one thing that keeps me from doing many things, but with my family and friends I have been able to make some long lasting changes to me and my home.

I wish you all a very Merry Christmas and all the best in 2010.


Tanya

Thursday, November 19, 2009

Many Changes

There have been many changes in my life lately.  This spring and summer I put my Cricut through the paces creating wedding 'Save The Date'magnets, invitations, embossing folders, stamps and decor for a very close friend of the family...aka "my big sister".  I finally used my Cricut to cut fabric when I created a dinosaur applique as part of my nephew's Halloween costume and now I am creating more original Christmas cards projects using Design Studio.  

I have been on waiting lists for weight loss surgery since 2002 and on Oct. 19/09 it finally happened.  Now that I am on the mend and losing weight I am hoping to spend the next few weeks in my craft room.  Many changes yet to come and I can't wait!   

Happy holidays everyone.

Tuesday, May 12, 2009

Design Team Launched

I am thrilled to announce that I am a member of Custom Crops' new design team! Visit their website at http://www.customcrops.com to discover original craft projects and Cricut Design Studio .cut files created by me and several other creative designers. This month I have created several cards that can be used for Mother's Day, birthdays, or invitations. Let us know how we are doing, what you like, what projects you would like to see next and we will work on it for you!

In the coming weeks look for my Save The Date magnets with embossing folder and wedding invitations as well as Father's Day cards all created using Cricut Design Studio and my Cricut Expression.

If you have something you want me to create please leave a comment on my blog or on the Custom Crops website. If you can, include a picture, finished size and any other 'particulars'. I love seeing what I can create next using Cricut Design Studio.

Pinwheel Layout

This layout was inspired by Karen, a Cricut messageboard member, who requested help to create this layout. I have included the template layer that I used to line up and size the triangles in the event you want to change the size of the triangles to create a smaller or larger pinwheel layout. Of course, you can remove the box in the 8"x8" layout layer and use any sized paper you would like. Happy cutting! This .cut file was created using the George & Basics Shapes cartridge.

PS: Look for a special announcement on my blog this Wednesday, May 13, 2009!

CLICK ON THIS LINK TO DOWNLOAD THE PINWHEEL LAYOUT .CUT FILE:

Monday, April 27, 2009

DateTime Error

Many of us who like to share our work with anyone, anywhere in the world, have likely come across the error message "DateTime Error" when you have downloaded a file from someone in another country. This is a flaw in Design Studio's programming. A simple thing like the order of the day and month completely blocks access to a shared .cut file. For some reason, when I create a .cut file the day, month and year are registered as 27/04/2009. However, for someone else (who lives in another country than me) to open my .cut file the order must become month, day and year. There is a simple fix, so this is more of a pain in the butt than anything. However, many people do not know about the program that helps fix the problem.

If you open a file in Design Studio and receive a "DateTime error" message follow these simple steps to fix the problem.
1. Download and save the hexedit.exe program to your computer:

2. Open the program hexedit.exe and click "Run"

3. A new window will appear with "Open" at the top, this is to prompted you to open the .cut file you wish to fix. Locate and click on the file namein your directory.

4. A window will open, with a black background. On the right hand column scroll down until you see "DateTime". (pink arrow) You will then change the first two sets of numbers to 01/01/2009.
(yellow arrow)


5. Go to FILE - SAVE AS and replace the orginal file with this replacement.

6. Go to Design Studio and open the fixed file, which should now open without any problems.

If you have any questions or problems opening my files please let me know and I will do everything I can to fix the problem. Thank you for taking interest in my work.

T

Geometric Shapes - Layout Page

This is a geometric frame layout that was requested by a Cricut Messageboard member. The original request was to make a two page layout in both 8"x8" and 12"x12" sizes, but I thought this would be a great learning opportunity for those who are just learning how to weld or use Design Studio. Use my file to learn who the layout is made and then you create the second page. To do this go to View - New Page to add a new layer to the file - copy and paste the shapes into the new layer and then just move them to their new location. HINT: use the arrow keys to move the shapes. If you count each arrow key stroke then you will know how far to move each shape side to side or up and down. Once you have created the new layer, and all shapes are their proper positions, it may be necessary to 'burp' the layer.


LESSON: To 'burp' select one of the perimetre shapes and delete it, select the opposite side, perimetre shape too. Delete one more shape so that there are no shapes inside shapes, then got to Edit - Undo Delete. Repeat the Undo Delete until all the shapes have reappeared on the virtual mat.
LESSON: To preview one layer at a time, make sure that has a check mark only on the layer that you want to preview. To find this feature right click anywhere on the mat and a box will appear - look for "Include Page In Preview".
LESSON: To save the file 'instantly' uncheck the "Include Page In Preview" in all layers, then save. You will find that the file saves immediately - no waiting!!!!

Here is the link to the Geometric Shape - Layout - Plantin Schoolbook
File name: SqRectCircleFrame.cut

http://www.mediafire.com/?yiaqnadtw1d

Thursday, March 5, 2009

Cutting Stamps....just like butter!

I took the plunge and finally cut into that pristine piece of silicone that was in my Cricut Stamp Kit. After a few small circle test cuts I discovered that I had to use the Deep Cut Blade at 6, Speed at 3, and Pressure at 4, which is not the settings recommended on the back of the packaging. No big deal, I always have 'cut' to my own drummer!

My first stamp cutting project focused on heart shapes and the phrase "Save The Date". I used Design Studio to make the most of the 6" x 6" stamping sheet and it allowed me to cut many more shpaes than if I had cut directly from my Cricut. When I placed the stamping sheet on my new mat I found that it was shifting because the adhesive was not strong enough to hold it in place. I ended up putting ATG tape on the back side of the stamping sheet and then placing it on my mat. It stayed put and I was able to cut everything successfully.

Here are photos of the stamps that I have cut thus far.

I have used the stamps to create my own heart patterned vellum that I will use to create folders that will hold the Save The Date Magnet with the couple's photo. (Photo of the magnet will come soon.) I am able to cut four folders per 12" x 12" sheet and I fit in as many small hearts from the negative to make our own table confetti. The folder is held together by two hearts that side into each other.

Tuesday, March 3, 2009

It's been too long!

It seems like it was only a couple weeks ago that I finished my week long marathon of Christmas card making, but as I glance at the calendar I discover that it is nearly time to start my seeds for the garden.  Right now I am working on projects for a summer wedding...not mine.  I have the task of making the save the date and the wedding invitations for a very close family friend, Cindy, and her fiance Bill.  Their wedding is at the end of July, outside, surrounded by forest, on Bill's parent's acerage.  It will be a very casual wedding.The colours, orange, pink and yellow, reflect the fun and relaxed atmosphere that perfectly describe the couple and how they want the wedding to feel. 

The Save the Date will be a magnet with the couple's photo placed inside of a vellum folder and attached to a postcard type card then placed in an envelope for mailing.  My Cricut has cut all of the magnets, all the strips, hearts and vellum folders.  I have also cut all of the stamps used for this project with my very first Cricut stamp kit and the postcard will be embossed using the new Cricut embossing folders.  I am in the middle of assembly line mode, but as soon as I have one entirely done I will post a picture.  You will have to rely on your imagination for a a few more days....so I hope I at least described them adequately....giggle, giggle.

The wedding invitation will rely heavily on my Cricut too....but I have to keep some secrets for now.  What I will say is they will be original, colourful, fun, detailed, and very custom!  I am not using one thing that is pre-made or 'ready to use'.  I promise to share when they are completed.

Back to work!
T