Welcome!

It is my hope that I can help to inspire your creativity and encourage your to try something new. I am always searching for new ways to express my creativity and imagination. Cards, invitations and 3D objects tend to be my focus, however I dabble in other media including acrylics, watercolours, sewing, custom picture framing and jewelry making to name a few.

If you have an idea of request for a .cut file in an unconventional way I would love to hear all about it! Constructive feedback is always appreciated.

On occasion I will offer Cricut Design Studio .cut files for free download. Please note that all files are my personal property and may not be used for retail or resale purposes. My files are being shared only for your personal use. You may not acquire my files for financial gain.

Wednesday, September 21, 2011

Halloween Costume Using My Cricut Expression

Last year my nephew requested a skeleton costume and I thought it was a perfect opportunity to use my Cricut Expression. The skeleton pattern came from the Everyday Paper Dolls Cartridge.


I resized it to the length that would fit an old set of sweat pants & long sleeved shirt, by cutting a couple pieces and placing on the pants and shirt to ensure the right length. Using a few pieces of the white Cricut 12 x 24 paper I cut all the pieces of the skeleton, layed out the pieces on my fabric and cut out all the pieces. Once I was done I used the approx. four foot skeleton in my window for Halloween...waste not, want not! (In fact, my nephew still has it on his bedroom wall a year later.) I used white flannel, that I already had on hand, and applied fabric stabilizer to make it easier to manage. I attached the bones using the zigzag stitch, with a tight stitch setting, with my sewing machine. It washed beautifully and stood up to the wear and tear of a four year old.

NOTE: I chose not to cut the fabric using my cricut only because I was using flannel and the stabilizer paper wouldn't stick well enough to the mat for clean cutting. However, you may choose to cut the pattern directly on the fabric, but you will go through a lot of cutting mats because of the lint fabric leaves behind.  I recoommend doing a test cut with the fabric of your choice before you decide which method you end up using for your project.

The one change I will make this year is to buy a pair of knit gloves or mittens, from the dollar store, and create finger bones. I will also add a removable flap to the bottom of each pant leg for the foot bones, that way they may be removed to avoid tripping when his shoes are off.  The flap will lay over the top of his shoes and be held in place with a loop of elastic to go around the bottom of the shoe.
I used some white 3 mm fun foam to cut out the skull, black 3 mm fun foam for the eyes, brows, cheeks, nose & mouth and then attached it to a ball cap so he could see well at night...he LOVED IT and wore it for weeks afterwards. This year he wants to be a pirate skeleton...too bad he's grown so much....I have to start from scratch again, but that's okay...it gives me an excuse to use my new Brother sewing & embroidery machine. Yippe!

Wednesday, October 27, 2010

Christmas Card Workshop Projects

At the November 28th Christmas Card Workshop we will be using a Cricut Expression, Cuttlebug, heat embossing and making a homemade embossing folder for just pennies.  We will create an original TLC Design 'Merry Christmas cutout card' using the Cricut Expression, Cricut Design Studio .cut file (TLC Design original design) and embellished with heat embossing.  We will also be sharing how to make a homemade embossing folder to be used with a Cuttlebug and/or hand embossing tools.

Project photos to follow shortly.

Christmas Card Workshop

Sunday, December 20, 2009

Merry Christmas & Happy New Year

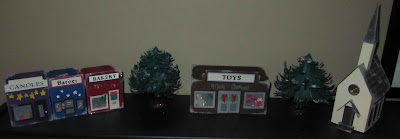
3D Christmas Village & Trees
created entirely from cardstock and my Cricut Expression.
I have to admit that 2009 has been a year of great change in my life. I have been working really hard this year live healthier and I had bariatric surgery in October. I have lost 60 pounds as of this week, 41 of which has been since surgery. It is a big change, but an exciting one and I cannot wait to see what 2010 brings. There were a lot of other changes in 2009 too. My family and I worked very hard at getting the landscaping completed in my backyard. Staining the fence, planting perrenials, laying bricks, and painting the house made a huge change to my yard. The house is barely recognizable and I am so grateful for all of my family and friends who made it all possible.


I have to say that owning a Cricut Expression has made a real change in my life too. I was able to create wedding invitations and save the dates that turned out amazing and wouldn't have been possible without a Cricut. Being part of the Custom Crops Design Team has also been a wonderful experience. Though I may not have been as prolific as I would have liked, being a part of the team and knowing that many other people enjoy using my .cut files gives me a great sense of pride. I am looking forward to pushing the limits of my Cricut to see what I can create in 2010. I just finished creating a Christmas Village, complete with a church, trees and stores...all in 3D. The Village .cut files are available at http://www.customcrops.com/. The picture of the village is at the top of this post.

My back may still be the one thing that keeps me from doing many things, but with my family and friends I have been able to make some long lasting changes to me and my home.

I wish you all a very Merry Christmas and all the best in 2010.


Tanya

Thursday, November 19, 2009

Many Changes

There have been many changes in my life lately.  This spring and summer I put my Cricut through the paces creating wedding 'Save The Date'magnets, invitations, embossing folders, stamps and decor for a very close friend of the family...aka "my big sister".  I finally used my Cricut to cut fabric when I created a dinosaur applique as part of my nephew's Halloween costume and now I am creating more original Christmas cards projects using Design Studio.  

I have been on waiting lists for weight loss surgery since 2002 and on Oct. 19/09 it finally happened.  Now that I am on the mend and losing weight I am hoping to spend the next few weeks in my craft room.  Many changes yet to come and I can't wait!   

Happy holidays everyone.

Tuesday, May 12, 2009

Design Team Launched

I am thrilled to announce that I am a member of Custom Crops' new design team! Visit their website at http://www.customcrops.com to discover original craft projects and Cricut Design Studio .cut files created by me and several other creative designers. This month I have created several cards that can be used for Mother's Day, birthdays, or invitations. Let us know how we are doing, what you like, what projects you would like to see next and we will work on it for you!

In the coming weeks look for my Save The Date magnets with embossing folder and wedding invitations as well as Father's Day cards all created using Cricut Design Studio and my Cricut Expression.

If you have something you want me to create please leave a comment on my blog or on the Custom Crops website. If you can, include a picture, finished size and any other 'particulars'. I love seeing what I can create next using Cricut Design Studio.

Pinwheel Layout

This layout was inspired by Karen, a Cricut messageboard member, who requested help to create this layout. I have included the template layer that I used to line up and size the triangles in the event you want to change the size of the triangles to create a smaller or larger pinwheel layout. Of course, you can remove the box in the 8"x8" layout layer and use any sized paper you would like. Happy cutting! This .cut file was created using the George & Basics Shapes cartridge.

PS: Look for a special announcement on my blog this Wednesday, May 13, 2009!

CLICK ON THIS LINK TO DOWNLOAD THE PINWHEEL LAYOUT .CUT FILE: